Monday, December 20, 2010

Year Two: Reflection, and Looking Forward

Happy belated birthday, my dearest blog. Looking back 2 years ago, when you were first born, it seems so long ago when I first started posting in my tiny west-end apartment. Back then, local food was on the come-up. The book, "The 100-Mile Diet", had been released for a year, and only a handful of the city folk I talked to understood the desire to know where their food comes from. I was already well into the ideologies of localism, but the thought of authoring a blog abhorred me for several reasons. 2008 was the year I broke down.

Fast forward to 2010. Locallyproducedfood is a household string of words, already adopted by the mainstream as a corporate social responsibility halo (see marketing campaigns for Hellman's mayonnaise, Lay's potato chips and Loblaws supermarkets). Nearly every neighborhood in downtown Toronto has a weekly farmer's market. I think it's a step in the right direction, though I warn that Motive is as important as Action.

But just when I thought I was the coolest local food kid on the block, I quickly discovered I still had a long way to go. So this year, I attended workshops on How To Start a Community Garden, and Mushroom Cultivation. My partner and I organized a CSA delivery group, tried to convince our community to set-up a garden at Joel Weeks park, flirted with guerrilla gardening and wild foraging, made and served veggie chili to hundreds of G20 protesters, and delved deeper into DIY craft through crochet, soaps and salves. We met dozens of people through Everdale, the G20 weekend, Plan B, Foodshare, Not Far From The Tree, and our daily travels, all of whom live and breathe activism, and continue to inspire and motivate my own life. And still, I feel this is only the beginning.

This year also brought about great strides in my balcony garden experiment, demonstrated by the appearance of fully grown, happy plants. I could not have done it without learning from Year One, proving that there is truth to those annoying "try, try again" quotes. The best advice I have coming out of Year Two is take care of your soil.

2011 will bring even more change. Starting in March, I'll be taking a year off to travel through Europe, Asia and Australia. It is with sadness that I announce that this blog will be on hold during that time. Though I'll no doubt be dying to share travel stories with you all, I can assure you it won't be through a travel blog or Facebook account. We'll figure something out.

Wishing you all a year of courage, change and action.

In solidarity,
Minda

Friday, December 17, 2010

How To Petrify an Egg

When the weather turns wintery, chickens naturally stop laying eggs. To combat this, many egg producers will mimick warm weather conditions by using artificial lighting, which keeps the hens popping out eggs even when it's cold out.

Even so, I believe that we should still consider eggiwegs to be a seasonal commodity. I loaded up on eggs at the market in September, with the intent on some hard-core pickling. I tried spiced pickled eggs, and spicy ginger pickled eggs, but the best of the lot was good ol' garlic dill pickled eggs.

But there's only so much pickled eggs that one can eat... not to mention the foul smelling gas that one produces after eating all those pickled eggs. So I also made a few tea eggs for fun.

Tea eggs are serious yummers. Dark caramel brown in colour, with a smokey, complex flavour. And so easy to make... just boil some eggs in tea and soy sauce, and enjoy! Or is it? Hm...

I sooo wanted to have my eggs turn out gorgeous like the ones in the above recipe. I followed the instructions exactly, or so I thought. When I took the eggs out after 3 hours of boiling, I realized something was horribly wrong.

Reading the recipe the second time and applying some logic, the problem because so obvious. I was supposed to KEEP the egg-boiling water, and add the ingredients to it. Instead, I had basically boiled eggs in a solution of soy sauce PLUS salt and NO WATER for 3 hours. But I just can't bear food being wasted. So I ate those rubbery, shriveled and incredibly salty eggs over the course of a week. Shiver.

One more quick note before I sign-off. Peeling the shell from an ultra-fresh chicken egg can be a maddening experience. My good friend shared a tip with me on how to keep your blood pressure low in this stressful situation: make a slight crack on the bottom (large) end of the egg before boiling. Something about the pressure inside the egg equalizing with the outside, she says. Ta-da! One sexy looking egg.

Tuesday, November 23, 2010

Garden Update: late-November

It's late November, and the temperature in Toronto has already dipped below the freezing point. The daylight hours are getting noticeably shorter each week. The wind and rain has been angry and unforgiving. Yet still, surprisingly, plants are still thriving on my balcony.

Chives, lamb's lettuce, arugula, peas and swiss chard are among the survivors. An herb pot of dill, thyme and coriander is looking very healthy and strong. A neglected container of nasturtium appears as it would in the summer. Even a mint plant, lover of sun and heat, is alive... though its leaves are slowly yellowing.

Sensing that the killer cold weather will arrive any day, I decided to cut down and eat everything that's left growing, while I still can. Looking at the leafless plant stumps makes me feel a little sad.

Coriander and pea shoots turn into a hearty noodle soup, thyme into cheese sandwiches, and the arugula goes well with tomato sauce and pasta. But the winner of this late harvest bunch are these seeded savoury mini-scones, a recipe from an old LCBO magazine I find squirreled away in my apartment. I adapted the recipe to make it gluten-free (replacing the wheat flour with a mix of brown rice and tapioca flour) and egg-free (by omission). Substituting the spinach for chard leaves, chives for green onions, and adding chopped dill proves successful.

Warm weather seems a long way off, but a few months on the local/winter diet of potatoes, carrots and apples will make next spring's plantings that much sweeter.

Sunday, November 7, 2010

Canadian Nom

I haven't had a butter tart for years. On a whim, I bought one at a farmer's market a few weeks ago, and POW!, the butter tart bender began. Since then, I have frequented many-a-butter-tart-shops, including The Bus Kitchen, Coffee Time, Treats, and Hannah's Kitchen. I've eaten raisin butter tarts, coconut butter tarts, but I seem to choose pecan butter tarts most often.

Fast forward to a different day. On a whim, I purchased a bag of Monforte's goat cheese curds at a Saturday market. Normally I buy them on Thursday, and eat them one-by-one while working at my desk in the office. But now I had them at home, and when I suggest eating them one-by-one, M shakes his head. A great idea starts to take shape... and POW! "No", he says. "We will make poutine."

Fast forward again to this morning. Daylight Savings Time blesses us with one extra hour, and we use the time to make two uniquely Canadian foods: poutine and butter tarts. Take that, Canada's Food Guide. Today is a day of eating brown-coloured, greasy carbohydrates.


The russet potatoes are boiled, and cut into fry shapes. While olive oil is heated up in a skillet, the mushrooms, onions and garlic are chopped up and cooked into a mushroom gravy. Potatoes are added to the oil, and deep fried until golden brown. The fries are blotted with a paper towel, tossed with salt and pepper, and arranged on a plate. Room-temperature cheese curds are added, and the hot gravy is poured on top. We both grab a fork each, and two heaping plates of vegetarian poutine are demolished in less time it takes to watch one episode of South Park.

While M succumbs to a food-induced coma, I get to work on the pecan butter tarts. The pastry is modified to a gluten-free version, using brown rice flour and tapioca starch. I opt for a corn syrup free filling, and substitute any shortening for mo' butter. These are BUTTER tarts, dagnabbit... though I am slightly put-off by the sheer volume of butter needed for this recipe. I also wonder what ingredients some of those cafes use, when a butter tart costs only a buck.


The tarts come out of the oven, golden hot and still bubbling. Unfortunately, the gluten-free flour blend I used didn't have enough gusto, and the pastry crumbles apart before I can even pop them out of the tin. Yet still, om nom nom.

Wednesday, November 3, 2010

CSA and the Agriculture Support Collective: Remembering the Times

October 28th was our last Plan B CSA box delivery date. Actually, Oct 14th was the official end date for the summer share, but because it came on so suddenly and unexpectedly, I ordered one fall share to soften the blow.

The program went smashingly. Many people were interested in participating, but for 5 of us, our curiosity and appetite took us further, and we formed an Agricultural Support collective and signed up for CSA summer share program. It took a few weeks to figure out the delivery system, having some complications due to the fact that we live in an apartment building that does not have a live person on-site to receive shipments. But with some cooperation and coordination, we all made it work. In the end, we received a summertime's worth of fresh, local, organic fruits and vegetables; the ingredients for an endless number of great meals and memories.

My final CSA box contained tomatoes, red onions, broccoli, boston lettuce, arugula, shiitake mushrooms, apples, shanghai bok choy, leeks and butternut squash.

This transformed into:

Kimchi noodle soup with steamed bok choy
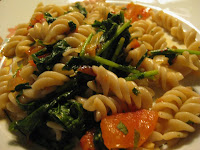
Arugula, tomato and shiitake mushrooms with pasta
Boston lettuce and avocado salad with lime dressing
Tomato and cheese sandwiches
Broccoli, leek and smoked cheddar cheese penne casserole
Vegan, gluten-free apple pancakes
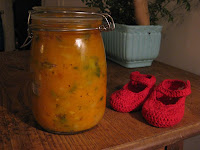
Leek and butternut squash soup (photographed with freshly crocheted red baby booties, *ahemshamelessselfpromotion*)

Thank you, Plan B and Agricultural Support Collective, for making this happen!


Friday, October 22, 2010

Recipe: Fried Radish Cake

I'm a lazy blogger. I try to put up a few posts a month, but knowing that it's mostly a couple of friends who read somewhat regularly (.... thanks, you guys!!), sometimes a-few-posts-a-month turns into one-post-a-month, if that.

Recipe posts are, by far, the ones I procrastinate writing the most. Why would anyone follow my recipe, when there are a million of the same recipe already on the interwebs? Plus my recipe is probably a rip from another website already. A website that is more popular and includes awesome artsy photos and user-uploaded feedback.

That being said, I've decided that when I do take the time to write-up a recipe, it will be a more "unusual" recipe. But still keeping it simple and with the local food theme, of course (i.e. all main ingredients can be grown in/around Toronto). Here is the first.

Fried radish (turnip) cake used to be one of my all-time favourite things to order at the congee house. Or insert "congee house" for "chinese restaurant" for those who don't know what congee is (God help your soul), though the dish may actually be from Singapore or Malaysia. Since abstaining from meat and seafood a few years ago, I haven't had the pleasure of enjoying FRC, as it contains dried seafood.

So when I found a small bunch of white radishes laying at the bottom of my CSA box, I knew exactly what I needed to do. Extra credit for having balcony-ready chinese broccoli (gai lan) on hand.


Fried Radish Cake (yes, vegetarian! Adapted from this recipe. Makes 2 meal-sized servings.
Season: Late Summer, Autumn

Ingredients:

2-3 small-medium white radishes --- grated, approx. 400g
1 cup rice flour
2/3 cup water
1/4 tsp salt
Vegetable oil for stir frying
1 clove garlic --- minced
2 green onions --- chopped (chives also works in a pinch)
4 shiitake mushrooms: fresh, or dried and reconstituted --- sliced
1 tbsp soy sauce 1 tbsp chili black bean sauce 1 tbsp oyster sauce 1 egg --- beaten
Dash of white pepper
Drizzle of toasted sesame oil
Cilantro
Sesame seeds (optional)

Cook's notes: Flavour (e.g. soy sauce, etc) measurements are to be used as a guidance. Adjust to your personal preference. Most of these ingredients are common in a Chinese household, but quite uncommon elsewhere. Don't go out and buy all of the ingredients if you don't have them. However, my opinion: soy sauce and chili black bean are mandatory.

Directions:

Steam the grated radish for about 30 mins, or until radish is translucent. Cool.

Mix rice flour, water and salt until smooth. Add steamed radish. Pour into a medium (5.5" diameter) ramekin, and steam for 40 mins. It will resemble a semi-solid, lumpy cake (see photo). Cool, and refrigerate overnight so the cake firms up. Cut into 1" chunks.

Heat some oil on medium-high heat on a skillet or wok. Add garlic and green onions, and stir for 10 seconds. Add mushrooms, and stir fry until lightly browned, about 3 mins. Add radish cake chunks and sauces, and stir fry until lightly browned, about 10 mins. Drizzle more oil if it looks dry. Move everything to the sides of the pan so there is a hole in the middle of your pan. Drizzle some oil into the hole, and add beaten egg. Scramble inside the hole, until it's almost done, then mix everything together. Stir fry for another 3-5 mins, to get it all a little more brown and crispy. Mix in white pepper, sesame oil, cilantro and sesame seeds (if using). Serve hot, with a side of steamed chinese broccoli with veggie oyster sauce.

Tuesday, October 19, 2010

Death by Canning

Likely not that dramatic. In any case, you should still read the Ecoholic article in this week's NOW magazine, re: nasty chemicals in canning lids:

http://www.nowtoronto.com/columns/ecoholic.cfm?content=177185

I had no idea that the standard canning lids contained bisphenol A (BPA). Nor was I aware of a reusable lid alternative.

Adria also references a few of her favourite canning websites. Warning though: before you start clicking on the links, be prepared for a few hours of reading and being inspired by great ideas. Speaking of which... you should also check out wellpreserved.ca, a fantastic food blog authored by two well-seasoned canners, who just happen to be my neighbors.

Tuesday, October 5, 2010

Les Pommes de Nuit Blanche

This past weekend was Toronto's 5th annual Nuit Blanche event. Being a night-owl and creative type, the idea of a dusk-to-dawn massive public art-party event naturally excites me. And when I received Not Far From The Tree's call for volunteers for their "Cider Making Spectacle" as part of the event, I couldn't help but join in on the fun.

I showed up at 3:30am at the Gladstone Hotel's Art Bar, along with 3 other volunteers. For the event, Not Far From The Tree brought in 400 lbs of apples, which was a small portion of the thousands of pounds of fruit they collect from trees around the city each year. For the last 3 hours of the event, we turned these unloved apples into steamy hot cider, which sold for $2 per sample.

The cider-making process was simple, but labour intensive:

Wash apples. Peel-off skin (using neat-o peeling device). Slice into quarters.


Crank slices through manual grinder.


Press. Collect cider (i.e. unfiltered juice).


Heat with cinnamon sticks. Pour into little cups, and sell.


By 6:30am, our little operation/performance/installation served out many little cups of cider, and a little cider-making know-how, to many happy people.

Saturday, October 2, 2010

Grape Jelly Fail

Throughout August and September, concord grapes were a staple in my diet. The source was our Plan B CSA box, and no matter how hard I tried and how purple my fingers became, I just could not eat them fast enough. Then, a brilliant idea: grape jelly!

Seemed simple enough. Squish grapes. Strain. Boil. Add sugar. Add pectin. Pour into jars and boiling-water process for shelf stability.

Upon tasting the grape juice after straining, I decided that it was sweet enough and didn't need much more sugar. I decreased the sugar in the recipe by more than half. BIG MISTAKE.

The jelly did not set. So the next day, I added more pectin. Again, still runny. The following week, I added more sugar. And yet still, a jar of purple liquid stared back at me.

I could add more sugar, but then it would be way too sweet. I could add more pectin, but I would have to buy another box and I would have no idea how much to add.

So now, I have 2 jars of grape concentrate for making sparkling grape drinks (just add soda water). Pretty tasty, I suppose. Lesson learned: don't mess around with jelly recipes. Also, when life gives you runny jelly, make drink concentrate.

Monday, September 20, 2010

Pots, Jars and Bottles

Last Friday, my partner and I decided to take a day trip to Prince Edward County, and see what “Ontario’s new wine region” and “one of Canada’s top escape destinations” was all about.

We ended up visiting about 8 wineries in “The County”, and taking home 18 bottles. Honestly, the wines were hit-and-miss… most were just okay, and surprisingly expensive (average mid-$20 per bottle). The best wine, by far, was the 2008 Unfiltered County Chardonnay from Norman Hardie. It was described as having an unmistakable note of “gun smoke”... how could I resist? It was bold, intensely flavoured and a real pleasure to drink.

Almost all of the wines sold by the wineries we visited were VQA-certified. Some of these VQA wines contained grapes from Niagara, some contained grapes from the County but not grown by the winery itself, and the rest contained grapes grown by the winery right in the County. Aside from being a badge of distinction, being VQA certified also allows the wine to be sold directly to restaurants (versus having to go through the LCBO).


We also visited the Highline Mushroom Farm. But don’t be fooled, as we were, by the name: this farm is actually an industrial complex, employing hundreds of people and shipping mushrooms to all over Canada.

As we rolled up with great reservation into the parking lot, we could smell what only can be described as rotten cabbages and compost. The farm’s “sales office” was a small corridor, where an elderly lady wearing a hair net pointed us to the stand-up fridge where the small selection of mushrooms-for-sale were kept. We bagged about a pound of portobello and shiitake, costing us only $6.


After stopping in Wellington for lunch, we popped our heads into the museum. They had a small exhibit on canning, to reflect the County's long history of industrial canning. I thought these directions for How To Can Chickens was particularly neat:


We also spent some time in the local library. I found this old gem, The Laura Secord Canadian Cook Book, which dates back to 1979:


Near the back pages of the book were recommended set dinners, one for each Canadian province. The Ontario Dinner included "Scalloped Turnip and Apples" and "York County Corn Bread"... neat-o. I also found a recipe for Toronto Pie, which is "a delicate, hot-milk sponge cake split and filled with raspberry jam".


Overall, it was a lovely day in Prince Edward County. If you’re looking for a wine-touring day trip from Toronto, I might encourage you to consider the more established Niagara region, but the County surely offers a refreshing change of scenery.

Tuesday, August 31, 2010

Read This! The Edible City

Think you love food? Think you know your city? I think not.

Though the title reads "from farm to fork", this is NOT just another book persuading you to buy local, sustainable, fair trade, organic, ethical, rah, rah. It’s a story about FOOD, and TORONTO. Rather, a collection of essays about craft beer, indie coffee shops, world culture, food policy, history, gardens, food service, street food, migrant workers, food sanitation practices and life as a rat. Just to name a few.

This book is easily one of my favourite reads this year. One of the best essays came from Wayne Roberts, Toronto’s own food policy darling. “How Toronto found its food groove” celebrates Toronto’s food movement past, present and future in a way that makes you truly feel proud of our city.

But really, they are ALL fantastic reads. Read one, read them all.

Friday, August 27, 2010

Recipe: Tomato Confit

Wish you could store all those ripe roma tomatoes for another day, but the thought of canning repels you? Try roasting them. It's super easy, and so tasty. The roasted tomatoes, or "tomato confit", will keep in the fridge for at least a week, and freezes well.

I used the instructions on the blog Chocolate & Zucchini, but didn't include the chili flakes or herbs. When packing the confit into jars, I layered with roasted garlic since I had it on-hand.

The confit has been incredible in sandwiches, omlettes, pasta, or even on their own. My favourite, though, is using the confit in a caprese salad. One slice of roasted tomato, one slice of buffalo mozzarella, one fresh basil leaf, salt, pepper, a glug of olive oil... there's nothing quite like it.

Thursday, August 26, 2010

Pickles and Party

This year's canning event was the biggest yet! Meaning, one more friend joined our party of two. Zing! We had a full day of peeling fruits and vegetables, packing into sterilized jars, making syrups and pickling liquids, boiling jars and listening to lids pop.

To avoid the scramble to find the right ingredients and quantities the morning of, I pre-ordered the produce from the Withrow Farmers Market a week in advance. Haystrom Farms from Picton, The Fresh Veggies Farm from Brampton, and Weber's Meats from Paisley were the Ontario producers that supplied the eggs and vegetables I needed to get my pickle on.

In total, we made over 40 jars of preserved peaches, beans, eggs, beets, cucumbers, tomatoes and pears. The jars now stand in a line above my kitchen cupboards, soldiers of food preservation ingenuity.

Wednesday, August 18, 2010

One Little Bugger

The leaves on one young plant went missing. Only a single stem was left. It puzzled me for a moment, until I noticed a chubby green caterpillar sitting on an adjacent plant.

You can see him in the background at the top of this photo, directly above the pathetic looking single stem left from the plant that used to have leaves. If you look closely at the caterpillar, you can see the self-satisfied smile on his smug little face.

Thursday, August 5, 2010

Recipe: Chilled Zucchini and Basil Soup

The summertime is the perfect time, if not the only time, for chilled soups. Sure, you don’t get the same heart-warming, snuggling-by-the-fireplace vibes that you do drinking a hot soup in the dead of winter. But a chilled soup is still delicious as f***.

But don't just stop at gazpacho. How about cucumber? Or this zucchini and basil soup. It's the perfect mid-summer harvest soup. Super simple, but tons of flavour. Serve it with a side of garlic cheese bread, and it's your new favourite summertime meal.

The recipe is adapted it from Emeril
’s website, and will make about 4 to 6 meal-sized servings. Ideally you would make it a day in advance to let the flavours develop. Enjoy!


Chilled Zucchini and Basil Soup

Season: Mid-summer, autumn


Ingredients:


1 onion
--- roughly diced

4 cloves of garlic
--- mince
d
6 zucchinis
--- roughly diced

4 cups vegetable broth

A generous handful of fresh basil
--- chopped

2 tbsp butter (optional)

Salt and pepper to taste


Directions:


In a pot on medium-high heat, saut
é onion with some oil (or butter if using) for 2 minutes. Add garlic, and sauté until onion turns transparent. Add zucchini, and sauté for another 2 minutes. Add broth, boil and simmer for 15 minutes. Blend with hand immersion blender, or in traditional blender in batches. Cool, cover and chill. Season with salt and pepper to taste.